REMOVING DUPLICATE PROMO PICTURES
(Not a new feature, just instructions for solving a temporary problem.)
Changes in the DAZ store made in the beginning of January 2022 have been affecting the program so that
it has been downloading an extra duplicate set of promo pictures for each product since then. This was
only discovered recently but a fix has now been made (version 1.016) so it again only downloads one set
of promos, as it’s supposed to.
Many of these duplicates differ from the originals in ways that makes it more or less impossible to
automatically detect and remove them in a reliable way (different HASH). The only viable solution to
ensure that they all are removed is therefore to delete all the product page data for purchases in 2022
and then re-download them. So here are the instructions for how to do that. Sorry for the inconvenience.
Note that it is necessary that you are online when doing this so the program can access the DAZ store.
Before deleting any offline product page data for a product the program scans the DAZ store to detect if
the product’s product page data are still available for download. If that’s not the case, product page data
for that product will not be deleted. This is to ensure that no unrecoverable offline data are being deleted
- unless of course DAZ removes the product page before you manage to re-download the deleted data.
Therefore you should re-download product page data for all your 2022 purchases immediately, after
having deleted their offline data, just in case.
In any case, it’s highly recommended to backup the Product Data folder regularly, so that you can restore
any product data no longer available, if for some reason you should lose them.
1. uncheck the Enable Data Check box on the main window to avoid any disturbing windows popping up
during the process.
2. under Search, select Order Date, type 2022 in the search field, and click the Search button. You will
now have all products listed that may be affected by the duplicate promo issue.
3. right click on the product list and select Check All to checkmark all products.
4. right click on the product list and select Add Checked Products to ‘Manage Product Data’ List from
the Context menu.
5. from the Tools menu select Manage Product Data. The Product Data Manager should now open
with all the selected products listed and checkmarked.
6. in the Select Product Data to Delete box first check the Product Page Data and then the Product
Page Pictures boxes (the last box can’t be checked unless the first one is checked).
7. click the Delete Selected Data button to start deleting the data.
The process may take a while, partly because of the online data check which may be slow or fast,
depending on the current load on the server.
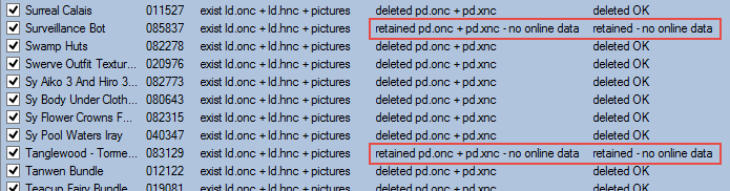
When finished, check the list to see if there are any product that haven’t been deleted because of missing
pages in the store. Status for these products looks like this:
Write down the SKUs for these products as you will have to manually delete any duplicate promos they
may have.
8. close the Product Data Manager window to get back to the main window. Make sure that all products
listed there are still checkmarked, then right click on the list and select Add Checked Products to
‘Download’ List from the Context menu.
9. from the Tools menu select Download Product Data and log in. In the Download Manager ensure
only Get Product Pages is checked to speed up download, and click Start Download to re-download all
the deleted product page data.
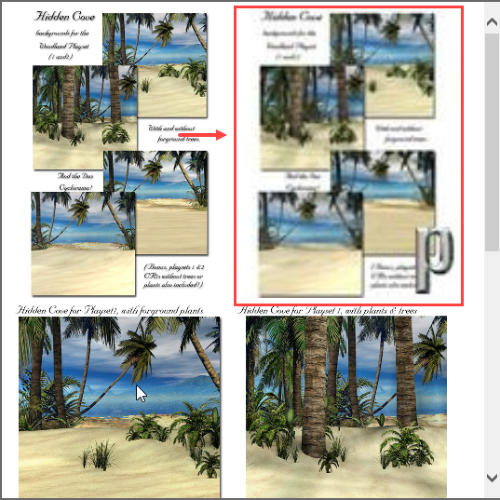
Many products include promo pictures like small 110 px/w icons and other irrelevant pictures you may
want to remove. The icons are generally but not always copies of existing promos; when Resize
Pictures is checked with 300 px/w they look the same as the original but blurred:
Other general types of unwanted pictures there may be are exact duplicates with different file names,
and blank pictures cluttering the program’s promo picture viewer.
Some pictures also have wrong file extensions so they won’t be displayed in the promo picture browser.
To fix these things a new feature Clean Up Promo Pictures has been added:
The default settings should remove all standard icons, all exact duplicates, most other unwanted
pictures, plus fix wrong file extensions, without removing anything of importance. You can adjust the
settings as you like, or re-run the process with higher settings, if needed. In any case, use at your own
risk.
It’s pretty slow as it does a lot of checking for each file, so if you have many products you may want to
fix them one year at a time, so you don’t have to start all over from the beginning if you select them all
and then cancel at some point to continue later.
You can however select whichever products you want to clean up, even a single one. Just checkmark
those you want to include and proceed from 3. below.
1. from the main window under Search, select Order Date, type year (e.g. 2012) in the search field,
and click the Search button, to list all products from that year.
2. right click on the product list and select Check All to checkmark all products.
3. right click on the product list and select Add Checked Products to ‘Manage Product Data’ List
from the Context menu.
4. from the Tools menu select Manage Product Data. The Product Data Manager should now open
with all the selected products listed and checkmarked.
5. click the Clean Up Promo Pictures button to open the Clean Up tool.
6. if you want to copy deleted files to a folder instead of deleting them, so you can inspect and maybe
restore some before deleting them completely, select a folder to copy them to and then check the Copy
deleted files to: box. The deleted files will be organized in the same way as in the Product Data folder,
in subfolders named by the product SKU. For files with wrong file extensions a copy with correct
extension will be created in the original folder and the original file will be moved to the folder with
deleted files.
7. click the Start button to start the clean up process.
VERSION 1.016
Fixes, changes and new features
New: Open Product Folder for selected product in Windows File Explorer from Product List Context
Menu.
New: Clean Up Promo Pictures.
Fixed: All Promo Pictures were downloaded twice (version1.015 and earlier), creating duplicates.
See instructions below for how to remove existing duplicates downloaded with these versions .
CLEAN UP PROMO PICTURES (NEW FEATURE)
Use this feature if you want to inspect and manage the deleted files, e.g. to see what may have been
deleted if you have used altered settings for deletion.
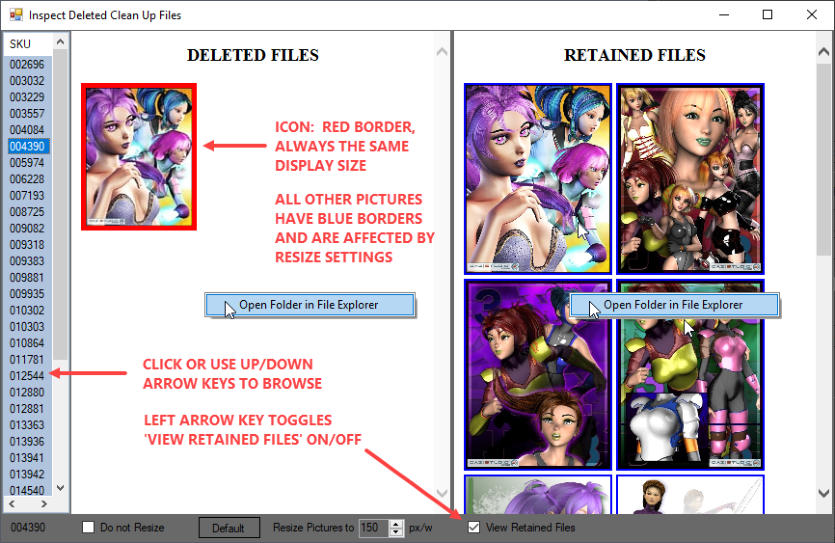
Click the Inspect Deleted Files button to open the inspection window. Pictures may load very slowly
depending on their size and display size settings. Wait until all pictures have loaded before browsing to
next product and don’t change/toggle the controls too fast, or you may get blank pages (browser quirk).
If that happens, click on the file SKU, toggle the View Retained Files box, or change the Resize
Pictures value.
Retained Files are the promo pictures left after deletion of unwanted files.
Using the Context menus you can open the folders in File Explorer and manually delete more unwanted
files if any left, or restore deleted files, using copy/paste or drag/drop. You can also drag/drop (copy only,
not move) pictures from the browser windows to folders in File Explorer, except for pictures with wrong file
extension.
The Default button will reset the Resize Pictures value to 150 px/w.
Below is shown the deleted/fixed file types you may encounter and how they look in the browsers. Pictures
with wrong file extensions can be opened with IrfanView if you want to inspect them.
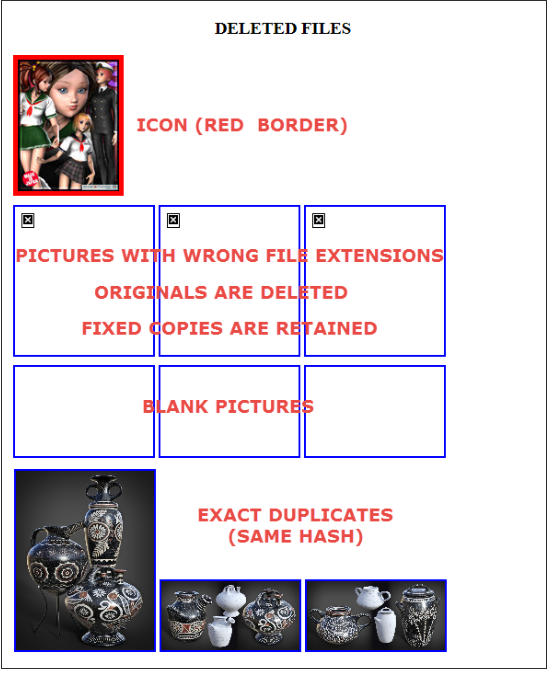

INSPECTING THE DELETED FILES